DIY - Replacing Main Tire and Tube
Posted: Thu Mar 29, 2012 5:31 pm
Intro:
Changing the main tires is not difficult if you have the right tools. The whole process of changing one tire and tube took me approximately two hours. The most difficult part is breaking the bead. My friendly A&P had a bead breaker that I used, but it was still difficult. I suspect there are other ways to break the bead, but I’m sure they all probably use some type of press.
Step 1:
Print out and review the following pages from the AMM:
Standard Torque Values - Chapter 20-00-00, pages 3 - 5.
Install a Brake Cylinder - Chapter 32-40-00, page 207 (Shows the torque value for the two bolts that attach the back plate).
Remove/Install a Main Wheel - Chapter 32-40-00, pages 201 – 202.
Step 2:
Order your parts. I obtained mine from LindaLou. I searched the internet and that store seemed to have the best price. Make sure you don’t use a Goodyear tube since they have problems (I had a landing with a flat tire at a remote airport because of their defective tube). Here’s a copy of the invoice for the tire and tube.

Step 3:
Assemble your tools:
Phillips screwdriver
10mm, 11mm, and 13mm sockets and open end wrenches.
Wire cutter
Pliers
Jack (I have a Bogart jack I carry in the plane)
Loctite (the removable type)
Talcum powder
Soapy water
Grease
Step 4:
Jack up the plane. Make sure you use wheel chocks or some other method so the plane doesn’t move while you are working on it.
Step 5:
Remove the wheel fairing:
Use the Phillips screwdriver to loosen the pop screws on the inside of the wheel fairing and remove the cover plate. Here’s a photo:

Use the 11mm socket to remove the two bolts on the inside of the fairing. Here’s a photo:
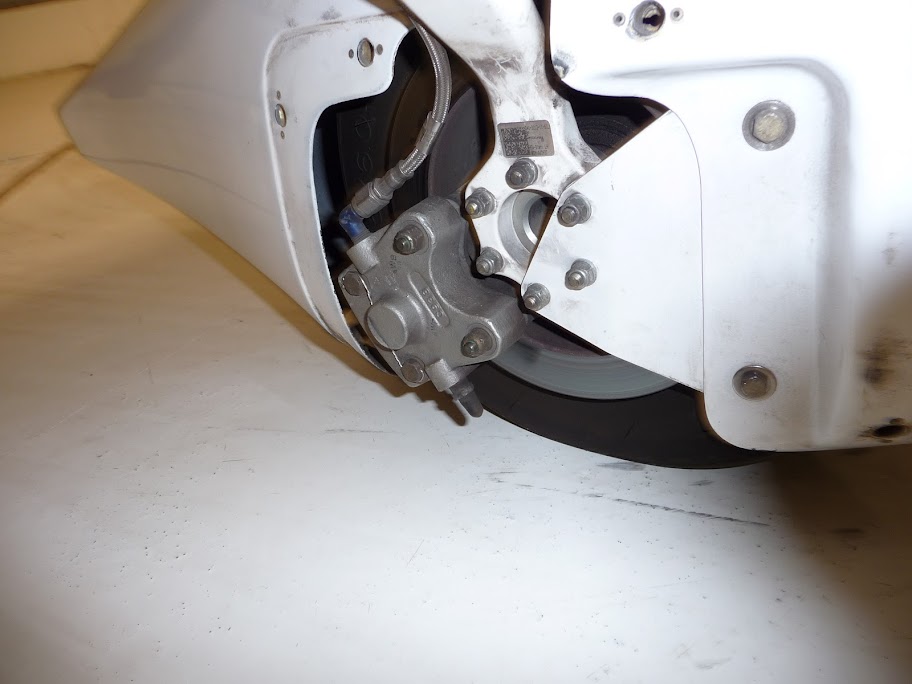
Use a 10mm socket to remove the one bolt and washer on the outboard side of the fairing. The main fairing should now come off.
Step 6:
Remove the brake back plate:
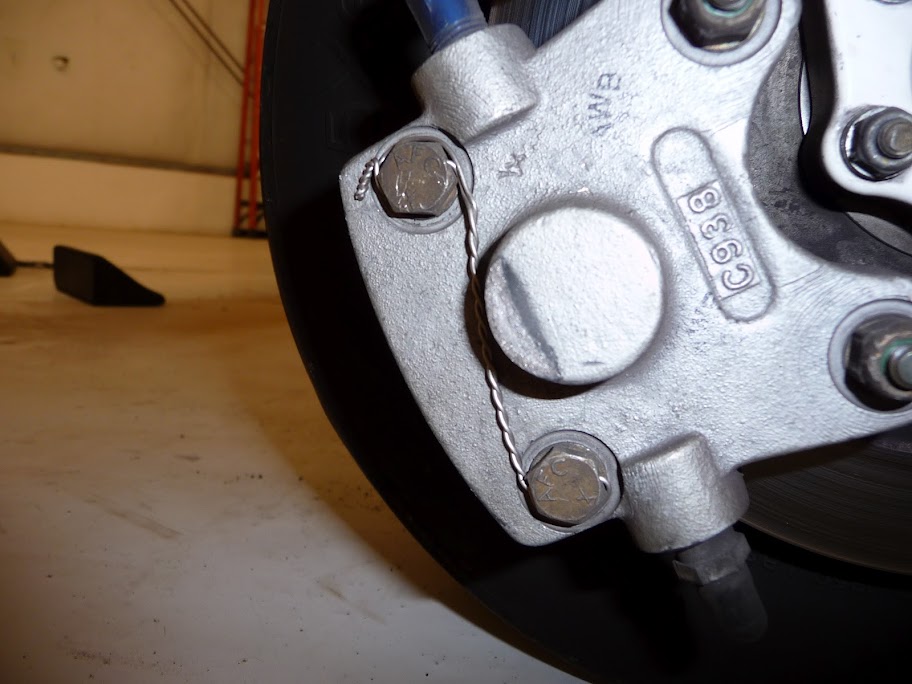
Use your wire cutters to cut the safety wire on the two bolts on the back plate of the brake caliper. Remove the two bolts. The outboard side of the brake pad will come loose. Here's a photo:
Step 7:
Remove the tire from the axle:
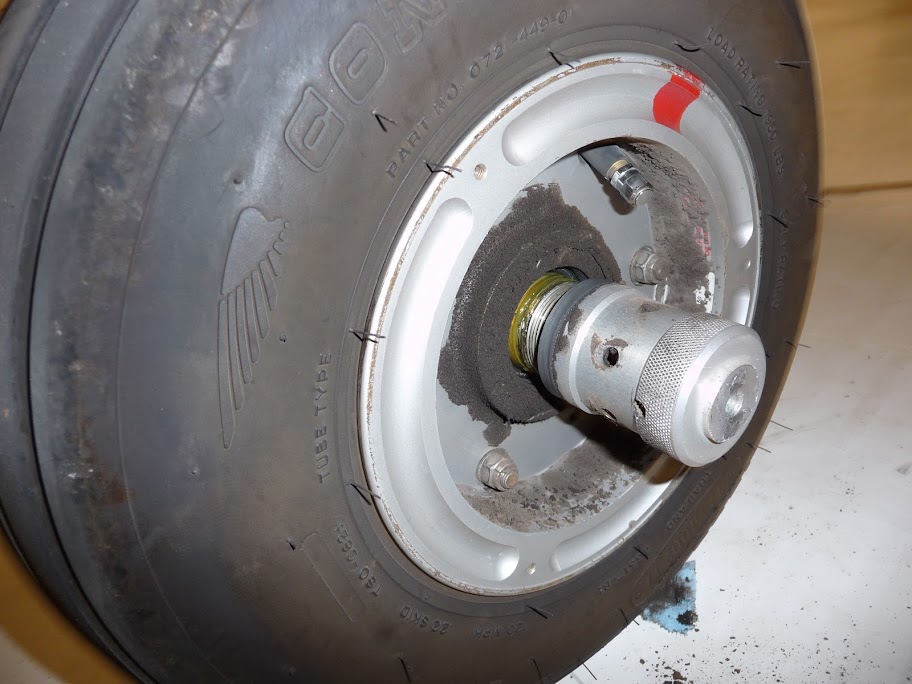
Use your 10mm socket and open ended wrench to remove the bolt and nut locking the large aluminum sleeve that holds the wheel and brake rotor in place. Here’s a photo of the sleeve after I removed the bolt and nut and unscrewed it part way:
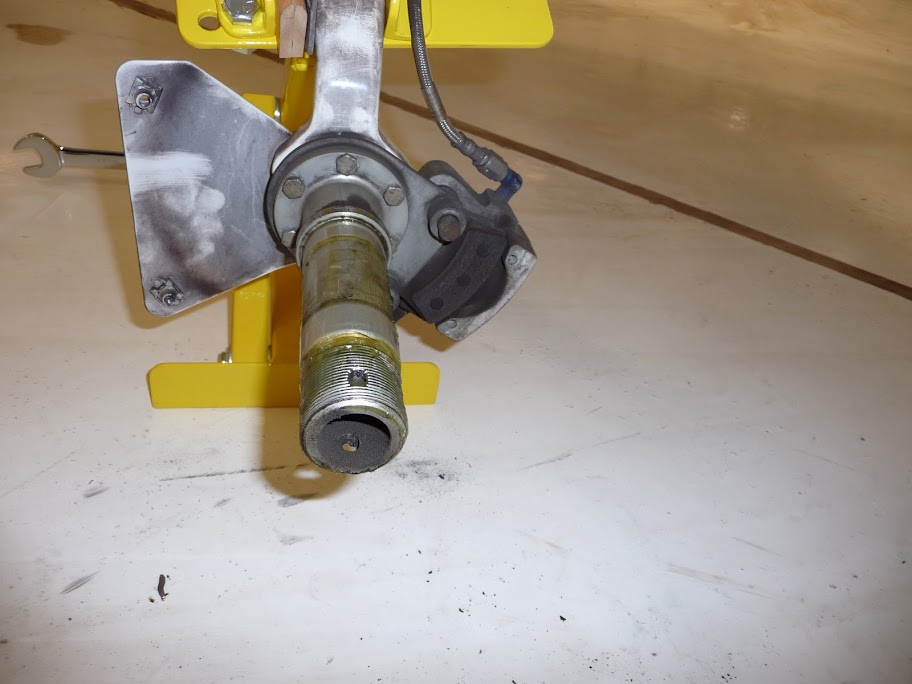
Unscrew the large aluminum sleeve and pull the tire, hub and brake rotor straight off the axle. Mine was a little difficult, but after a few pulls, it popped off. Here’s a photo of the axle after the wheel was removed:
Step 8:
Remove the tire and tube from the hub:
Use your 13mm socket and open ended wrench to remove the three bolts and nuts holding the brake rotor in place and the two halves of the hub together. Remove the brake rotor. Reinstall one of the bolts and nut to hold the two halves together while you break the bead. Let all of the air pressure out of the tire. Break the beak of the tire. As I stated before, this was probably the most difficult part of the process and I had the use of a bead breaker. Remove the old tire and tube. Remove the one bolt and nut that you use to hold the hub together and remove the tube and tire from the hub. Here’s a photo of the hub, brake rotor, tire and tube before installation:
Step 9:
Install the new tire and tube:
Put some air into the new tube. The tube will have some powder on it already, but thoroughly coat the tube with talcum powder to prevent it from getting pinch punctures from the tire. Next, use the soapy water and coat the bead of the tire and the hub so the tire will set properly. Put the valve side on first and then insert the tube. Make sure the tube does not get pinched when you install the other side of the hub and then install that side of the hub. You will probably need to attach one of the bolts and nut to bring the hubs together before you attach the brake rotor. Attach the brake rotor and install and tighten the three bolts and nuts to the correct torque value. Pump up the tire and listen for any leaks.
Step 10:
Put the tire back on the axle:
Lightly grease the axle where the wheel bearings rest and push the tire back onto the axle. Screw the aluminum sleeve back on and make sure the hub is all the way on the axle. Back the sleeve off very slightly and then install the lock bolt and nut.
Step 11:
Install the brake back plate and wheel fairing:
Install the brake pad with the two bolts and torque to the correct value. MAKE SURE YOU NOW CORRECTLY INSTALL THE SAFTETY WIRE. If you don’t know how to do it, get your A&P to help you. There is a correct way to do it. Install the wheel fairing in reverse order from removal. Use the loctite on the bolt with the large washer on the outboard side of the wheel fairing or it may vibrate loose.
Step 12:
Make the appropriate entries into the log books.
Changing the main tires is not difficult if you have the right tools. The whole process of changing one tire and tube took me approximately two hours. The most difficult part is breaking the bead. My friendly A&P had a bead breaker that I used, but it was still difficult. I suspect there are other ways to break the bead, but I’m sure they all probably use some type of press.
Step 1:
Print out and review the following pages from the AMM:
Standard Torque Values - Chapter 20-00-00, pages 3 - 5.
Install a Brake Cylinder - Chapter 32-40-00, page 207 (Shows the torque value for the two bolts that attach the back plate).
Remove/Install a Main Wheel - Chapter 32-40-00, pages 201 – 202.
Step 2:
Order your parts. I obtained mine from LindaLou. I searched the internet and that store seemed to have the best price. Make sure you don’t use a Goodyear tube since they have problems (I had a landing with a flat tire at a remote airport because of their defective tube). Here’s a copy of the invoice for the tire and tube.
Step 3:
Assemble your tools:
Phillips screwdriver
10mm, 11mm, and 13mm sockets and open end wrenches.
Wire cutter
Pliers
Jack (I have a Bogart jack I carry in the plane)
Loctite (the removable type)
Talcum powder
Soapy water
Grease
Step 4:
Jack up the plane. Make sure you use wheel chocks or some other method so the plane doesn’t move while you are working on it.
Step 5:
Remove the wheel fairing:
Use the Phillips screwdriver to loosen the pop screws on the inside of the wheel fairing and remove the cover plate. Here’s a photo:
Use the 11mm socket to remove the two bolts on the inside of the fairing. Here’s a photo:
Use a 10mm socket to remove the one bolt and washer on the outboard side of the fairing. The main fairing should now come off.
Step 6:
Remove the brake back plate:
Use your wire cutters to cut the safety wire on the two bolts on the back plate of the brake caliper. Remove the two bolts. The outboard side of the brake pad will come loose. Here's a photo:
Step 7:
Remove the tire from the axle:
Use your 10mm socket and open ended wrench to remove the bolt and nut locking the large aluminum sleeve that holds the wheel and brake rotor in place. Here’s a photo of the sleeve after I removed the bolt and nut and unscrewed it part way:
Unscrew the large aluminum sleeve and pull the tire, hub and brake rotor straight off the axle. Mine was a little difficult, but after a few pulls, it popped off. Here’s a photo of the axle after the wheel was removed:
Step 8:
Remove the tire and tube from the hub:
Use your 13mm socket and open ended wrench to remove the three bolts and nuts holding the brake rotor in place and the two halves of the hub together. Remove the brake rotor. Reinstall one of the bolts and nut to hold the two halves together while you break the bead. Let all of the air pressure out of the tire. Break the beak of the tire. As I stated before, this was probably the most difficult part of the process and I had the use of a bead breaker. Remove the old tire and tube. Remove the one bolt and nut that you use to hold the hub together and remove the tube and tire from the hub. Here’s a photo of the hub, brake rotor, tire and tube before installation:
Step 9:
Install the new tire and tube:
Put some air into the new tube. The tube will have some powder on it already, but thoroughly coat the tube with talcum powder to prevent it from getting pinch punctures from the tire. Next, use the soapy water and coat the bead of the tire and the hub so the tire will set properly. Put the valve side on first and then insert the tube. Make sure the tube does not get pinched when you install the other side of the hub and then install that side of the hub. You will probably need to attach one of the bolts and nut to bring the hubs together before you attach the brake rotor. Attach the brake rotor and install and tighten the three bolts and nuts to the correct torque value. Pump up the tire and listen for any leaks.
Step 10:
Put the tire back on the axle:
Lightly grease the axle where the wheel bearings rest and push the tire back onto the axle. Screw the aluminum sleeve back on and make sure the hub is all the way on the axle. Back the sleeve off very slightly and then install the lock bolt and nut.
Step 11:
Install the brake back plate and wheel fairing:
Install the brake pad with the two bolts and torque to the correct value. MAKE SURE YOU NOW CORRECTLY INSTALL THE SAFTETY WIRE. If you don’t know how to do it, get your A&P to help you. There is a correct way to do it. Install the wheel fairing in reverse order from removal. Use the loctite on the bolt with the large washer on the outboard side of the wheel fairing or it may vibrate loose.
Step 12:
Make the appropriate entries into the log books.