The overhead reading/map lights in our DA40 have been a continual problem for us. They fail to work more often then they actually work. When we first got our DA40 (used), one bulb was burned out, and the others worked maybe half the time, if you fiddled with the switches. After the second bulb burned out, I replaced them all with LED bulbs, but the switches on all 3 units are still very temperamental.
I just had the AD for the Rear Hatch Release Pin done, which requires removing the rear map light to access the pin. With all 3 lights now uncalked, I decided to remove them all and take them home for further study. After a night of playing with one of them a while, I think I have found the weak link. Currently I have all 3 of them working 100% of the time, at least on my bench at home. Next I will reinstall them and see how they work in the plane.
Is anyone else having problems with intermittent map lights? If so, and assuming my “fix” works, I will post some pictures and explain what I did to get them to work again.
Overhead Light Repair
Moderators: Rick, Lance Murray
-
Jean

- 5 Diamonds Member

- Posts: 741
- Joined: Mon Jun 28, 2010 7:28 am
- First Name: Jean
- Aircraft Type: DA40
- Aircraft Registration: N446DC
- Airports: EBLG
- Has thanked: 30 times
- Been thanked: 18 times
Re: Overhead Light Repair
Yes Rick, we have the same problem and, as my plane is going to be grounded for a while for propeller governor issue, I will have plenty of time to fix the overhead lights ! 

40.446, G1000, KAP 140, Hartzell Metal
-
Charles K

- 4 Diamonds Member

- Posts: 308
- Joined: Mon Feb 21, 2011 7:46 pm
- First Name: Charles
- Aircraft Type: DA40
- Aircraft Registration: N5WU
- Airports: KCCR
- Has thanked: 26 times
- Been thanked: 98 times
Re: Overhead Light Repair
Hello
Can you tell me where you got the LED lights, the manufacturer, and price !
Thanks
Can you tell me where you got the LED lights, the manufacturer, and price !
Thanks
-
Rick
- 5 Diamonds Member
- Posts: 1575
- Joined: Tue Jul 06, 2010 10:09 pm
- First Name: Rick
- Aircraft Type: DA40
- Aircraft Registration: NONE
- Airports: KROA
- Has thanked: 107 times
- Been thanked: 297 times
Re: Overhead Light Repair
I ordered this bulb: http://www.bulbtown.com/T3_1_4_6V_28V_W ... /l8042.htmCharles K wrote:Can you tell me where you got the LED lights, the manufacturer, and price !
The light from the LED bulb is much more white then the yellow-ish light from the OEM bulbs, and I was somewhat concerned about it being too bright, but after using it at night, I really like it. Much easier to read my kneeboard with my aging eyes. I don't think it is really any brighter then the old bulb, just "better" light.
One word of caution - since they are LEDs, they only pass current in one direction, so be sure to test it before you snap the map light back in. If it doesn't work, you need to rotate the bulb holder 180 degrees and re-insert it. Benefits should be less heat (I know the old bulb got pretty hot), and much less battery drain if/when we accidentally leave the pilot map light on (since it's not switched off by the mains)!
Roanoke, VA (KROA)
-
Graham

- 4 Diamonds Member
- Posts: 295
- Joined: Wed Jan 19, 2011 5:35 pm
- First Name: Graham
- Aircraft Type: DA40
- Airports: CYKZ
- Has thanked: 1 time
- Been thanked: 2 times
Re: Overhead Light Repair
Jean, what is problem with the governor?Jean wrote:Yes Rick, we have the same problem and, as my plane is going to be grounded for a while for propeller governor issue
Great idea! I know a few who have drained their battery down and spoiled their flying day.Rick wrote:Benefits should be less heat (I know the old bulb got pretty hot), and much less battery drain if/when we accidentally leave the pilot map light on (since it's not switched off by the mains)!
-
Rick
- 5 Diamonds Member
- Posts: 1575
- Joined: Tue Jul 06, 2010 10:09 pm
- First Name: Rick
- Aircraft Type: DA40
- Aircraft Registration: NONE
- Airports: KROA
- Has thanked: 107 times
- Been thanked: 297 times
Re: Overhead Light Repair
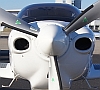
For those of you who haven't seen the map light assemblies, I found the pictures I took when I had the overhead lights removed. They are pretty cheaply made - they look and feel like something you would find in an old car. The switch is the weak link - moving it simply bends a thin copper strip to make contact with another piece of copper. If your switch doesn't work, or is intermittent, you simply need to bend the cheap piece of copper a bit so it makes good contact again. It's pretty obvious once you remove the light and look at it.
- All three light assemblies, one with the grey rubber cover removed.
- Map Lights (all 3).JPG (235.34 KiB) Viewed 3845 times
- One map light assembly with the rubber cover removed.
- Map Light (left side).JPG (233.98 KiB) Viewed 3845 times
- With the bulb removed.
- Map Light (left side with bulb).JPG (223.18 KiB) Viewed 3845 times
Roanoke, VA (KROA)
-
Tim H
- 4 Diamonds Member
- Posts: 453
- Joined: Wed Dec 29, 2010 3:44 pm
- First Name: Tim
- Aircraft Type: DA40
- Aircraft Registration: N233MA
- Airports: KMGY
- Been thanked: 34 times
Re: Overhead Light Repair
I am having he same problem(s) with my light assemblies. How do I get the assemblies out of the overhead panel? Thanks.
-
Rick
- 5 Diamonds Member
- Posts: 1575
- Joined: Tue Jul 06, 2010 10:09 pm
- First Name: Rick
- Aircraft Type: DA40
- Aircraft Registration: NONE
- Airports: KROA
- Has thanked: 107 times
- Been thanked: 297 times
Re: Overhead Light Repair
Tim,Tim H wrote:I am having he same problem(s) with my light assemblies. How do I get the assemblies out of the overhead panel? Thanks.
Ours had a clear caulking around the light which has to be removed - a razor blade or small knife works pretty well. Once you remove all the caulking, you can gently pry the switch-end of the light out - you will notice a bent piece of metal that holds the light assembly in place. The entire assembly should just pop out. The wire just unplugs from the side of light.
If you're going to go to all the trouble of removing the lights, you may as well replace the bulbs with the LED version while you're in there!
Roanoke, VA (KROA)
-
Tim H
- 4 Diamonds Member
- Posts: 453
- Joined: Wed Dec 29, 2010 3:44 pm
- First Name: Tim
- Aircraft Type: DA40
- Aircraft Registration: N233MA
- Airports: KMGY
- Been thanked: 34 times
Re: Overhead Light Repair
Yes, that was my plan. I want to take all three lights out and replace the bulbs. The switch on one of the lights is "broken". It will not rock back and forth and appears to be seated incoorectly. That is my primary reason for taking the assembly out. Since I have it out, I will replace the bulb. Is the polarity of the LED bulb obvious or is it trial and error to get it to work? What is the purpose of the sealer? Vibration, air leaks, other? What sealer do I use after I re-install? Thanks!!
-
Rick
- 5 Diamonds Member
- Posts: 1575
- Joined: Tue Jul 06, 2010 10:09 pm
- First Name: Rick
- Aircraft Type: DA40
- Aircraft Registration: NONE
- Airports: KROA
- Has thanked: 107 times
- Been thanked: 297 times
Re: Overhead Light Repair
Hopefully you will be able to repair the broken switch!
The polarity of the LED bulb was not obvious to me - I just pluged each light back in at the plane and tried it, then rotated the bulbs 180 degrees on the ones that didn't work.
I think the purpose of the sealer is mostly to plug up the air leak around the lights. The area above the lights (and speaker) is directly connected to the air inlet under the left wing root, which feeds the two rear-seat air vents and the overhead air vents. I flew with ours unsealed for several months while I was trying different solutions, and a lot of air leaks around the lights. Even with the lights sealed, there is still some leakage through the light itself - our rubber covers have a few small holes in them.
Diamond now recommends sealing the lights with a grey putty-like substance called Terostat. I haven't had any luck finding it online, but your nearest Diamond shop should have some on hand. There is a MSB for the rear hatch emergency pin that requires removing and re-sealing the rear overhead light - if you haven't had this done yet, you should get it done while you have the lights removed (but after you fix them). Then either get some Terostat from the shop, or just have them reseal the lights after they perform the MSB.
While you are working in this area, you may as well fix the air leak through the speaker, too! Remove the screws holding the speaker cover in place. Then, cut a small piece of heavy plastic sheet the same size as the speaker cover, and put the plastic inside of the cover. Replace the cover, making sure the edges of the plastic are trapped between the cover and the interior of the plane.
Roanoke, VA (KROA)